jueves, 20 de abril de 2017

MENÚ SEMANAL 4

Después de muuuchoo tiempo, aquí llega la cuarta entrega de menú semanal. Espero así daros ideas para que comáis de manera variada (aunque sea en "Tupperware"). Como siempre, incluyo los enlaces si las recetas o, parte de ellas, han sido ya publicadas en el blog).


(*) Próximamente...
(1) Porra de naranja aquí.
(2) Empanadillas griegas aquí.

PD: No olvidéis alguna pieza de fruta y algo para beber (si es bajo en calorías, mejor todavía).

************************

After a long time, here it is the fourth issue dedicated to our weekly menu. My sincere hope is that you could eat a varied diet (although you do it in "Tupperware"). As always, I include the items posted.


(*) Soon...
(1) "Porra" made of orange juice here.
(2) Greek small pasties here.

PS: Please, don't forget to have one piece of fruit and something to drink (the best is a drink low in calories).
GuardarGuardar

lunes, 17 de abril de 2017

BRIOUATS DE QUESO BLANCO


Ingredientes
- Pasta filo
- Cebolla
- Queso blanco light (de tipo burgos)
- Sal
- Azúcar
- Agua de azahar
- Aceite de oliva
- Miel

1. Relleno
Cortar la cebolla (media puede ser suficiente) en trocitos muy finos y sofreírla en una sartén con un poco de aceite oliva, añadiéndole una pizca de sal. Mientras tanto, se puede ir machacando el queso blanco con ayuda de un tenedor, agregando una cucharadita de azúcar (blanco) y una cucharada de agua de azahar. El relleno quedará terminado, cuando incorporemos a esta mezcla, la cebolla blandita.

2. Pasta filo
Cortar la pasta filo en tiras de unos 5 cm, con ayuda de las tijeras. Antes de colocar el relleno, hay que humedecer las tiras de pasta con mantequilla derretida (según las indicaciones del paquete), aunque yo las he ido pintando con aceite de oliva. Para hacer los paquetitos, cogemos una tira de pasta filo, ponemos un poco de relleno en un ladito y procedemos de la siguiente forma (hasta que nuestros "triangulitos" estén listos):


3. Horneado
Colocaremos los briouats sobre un papel de horno en una bandeja, y los dejaremos en el horno a unos 180º durante unos 15-20 minutos, hasta que estén dorados.

4. Decoración
Una vez fuera del horno se suelen sumergir en miel caliente y se añaden almendras picadas antes de servirlos; en mi caso, solamente les añadí un poco de miel por encima (como hacemos aquí con las berenjenas fritas).

NOTA: Debéis aseguraros de que los briouats queden bien sellados, para evitar que el relleno se salga durante el horneado.

************************

Ingredients
- Filo pastry
- Onion
- White cheese (from Burgos)
- Salt
- Sugar
- Orange blossom water
- Olive oil
- Honey

1. Filling
Cut the onion (it may be sufficient with a half of it) into very thin pieces and fry lightly it in a pan with a little of olive oil and a pinch of salt. Meanwhile, use a fork to mash the white cheese in a bowl with a teaspoon of white sugar and a tablespoon of orange blossom water. The last step is to add the fried onion to this mixture: our filling will be ready to be used.

2. Filo pastry
Cut the filo pastry in strips of 5 cm with scissors. First, these strips should be moistened with melted butter (according to the instructions), although in my case I used olive oil. Then, to make the little packets, place a teaspoon of the filling on one side of a filo pastry strip and follow the picture above to get a triangle shape.

3. Baking
Use a oven tray with greaseproof paper to bake the briouats at 180ºC for about 15-20 minutes (until they turn golden brown).

4. Decoration
Once outside the oven, before serving them, dip the briouats in heat honey and sprinkle with chopped almonds; in my case, I served them with a drizzle of honey on top (like typical fried aubergines with honey).

NOTE: Try to fold very well the briouats to enclose the filling during baking.
GuardarGuardar
GuardarGuardarGuardarGuardarGuardarGuardarGuardarGuardarGuardarGuardarGuardarGuardar

viernes, 3 de marzo de 2017

PASTEL DE ZANAHORIAS VEGANO


Tenía infinitas ganas de cocinar un pastel de zanahorias (sin huevo, claro), pero después de probarlo en "JULIA BAKERY" me decidí a prepararlo en mi cocina-laboratorio. Os enseño las fotos tanto de los preparativos como del resultado final.


Ingredientes
- 300 g de harina de repostería (ver NOTA)
- 270 g de azúcar moreno
- 1 cucharadita de sal
- 1 cucharadita de canela
- 1 cucharada de bicarbonato
- 1 cucharada de levadura para repostería
- 300 g de zanahorias
- 130 g de nueces
- 200 ml de agua
- 180 ml de aceite de girasol
- 1 cucharada de esencia de vainilla

NOTA: La receta original decía que se usara harina integral de trigo.

1. Mezcla seca
Mezclamos todos los ingredientes secos: harina + azúcar moreno + sal + canela + bicarbonato. Después los tamizamos (con ayuda de un colador) a un recipiente más grande.

2. Sólidos
Pelamos y rallamos las zanahorias (para ello, yo usé mi mandolina de cocina); partimos y cortamos las nueces en trocitos pequeños.

3. Mezcla húmeda
Mezclamos en otro bol los ingredientes húmedos: agua + aceite de girasol + esencia de vainilla. A continuación, vamos incorporándola a la mezcla de los ingredientes secos, batiéndola con una varilla para que se integren todos los elementos. Por último, agregamos las zanahorias y las nueces y lo mezclamos todo hasta que la masa sea homogénea.

4. Horneado
Vertemos la mezcla en un molde de horno alargado, que previamente habremos forrado con papel vegetal (esto nos ayudará a la hora del desmolde). La temperatura de horneado será de 180ºC, y habrá que dejarlo durante aproximadamente 1 hora (pero puedes comprobarlo pinchando el centro del  pastel con una varilla, y viendo si sale seco o no).
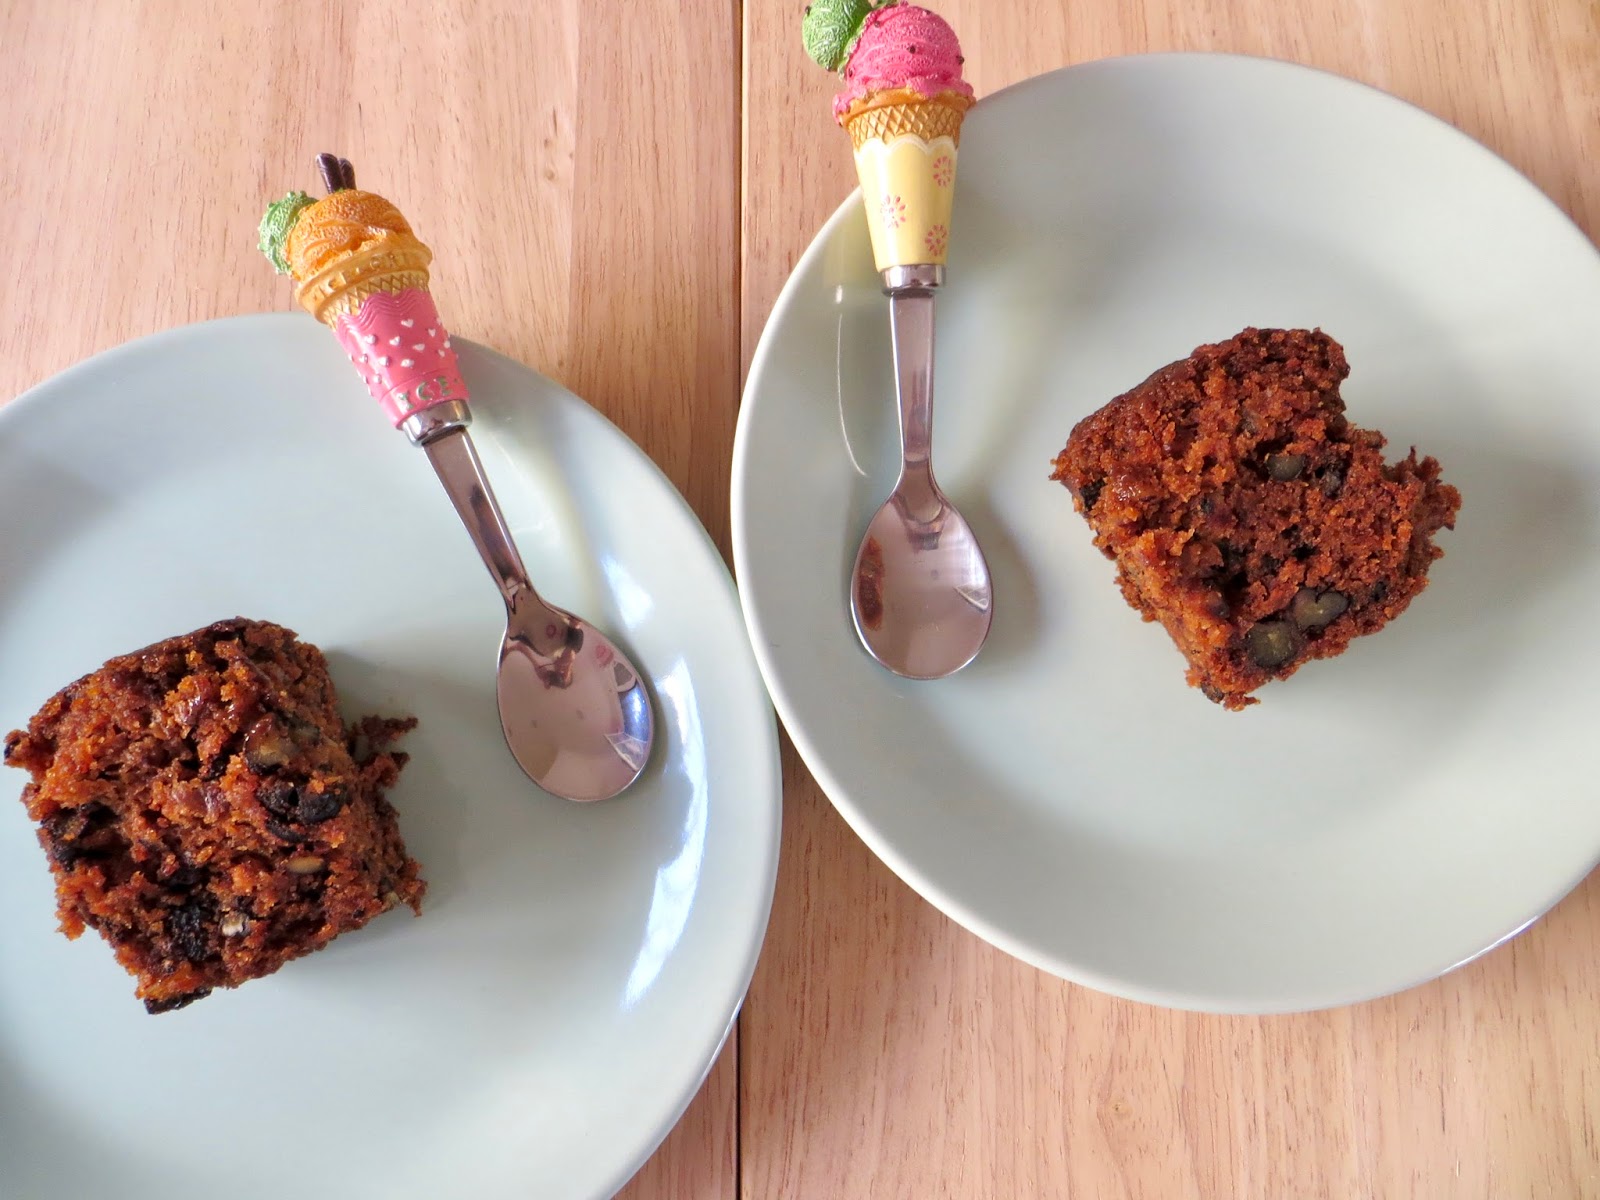
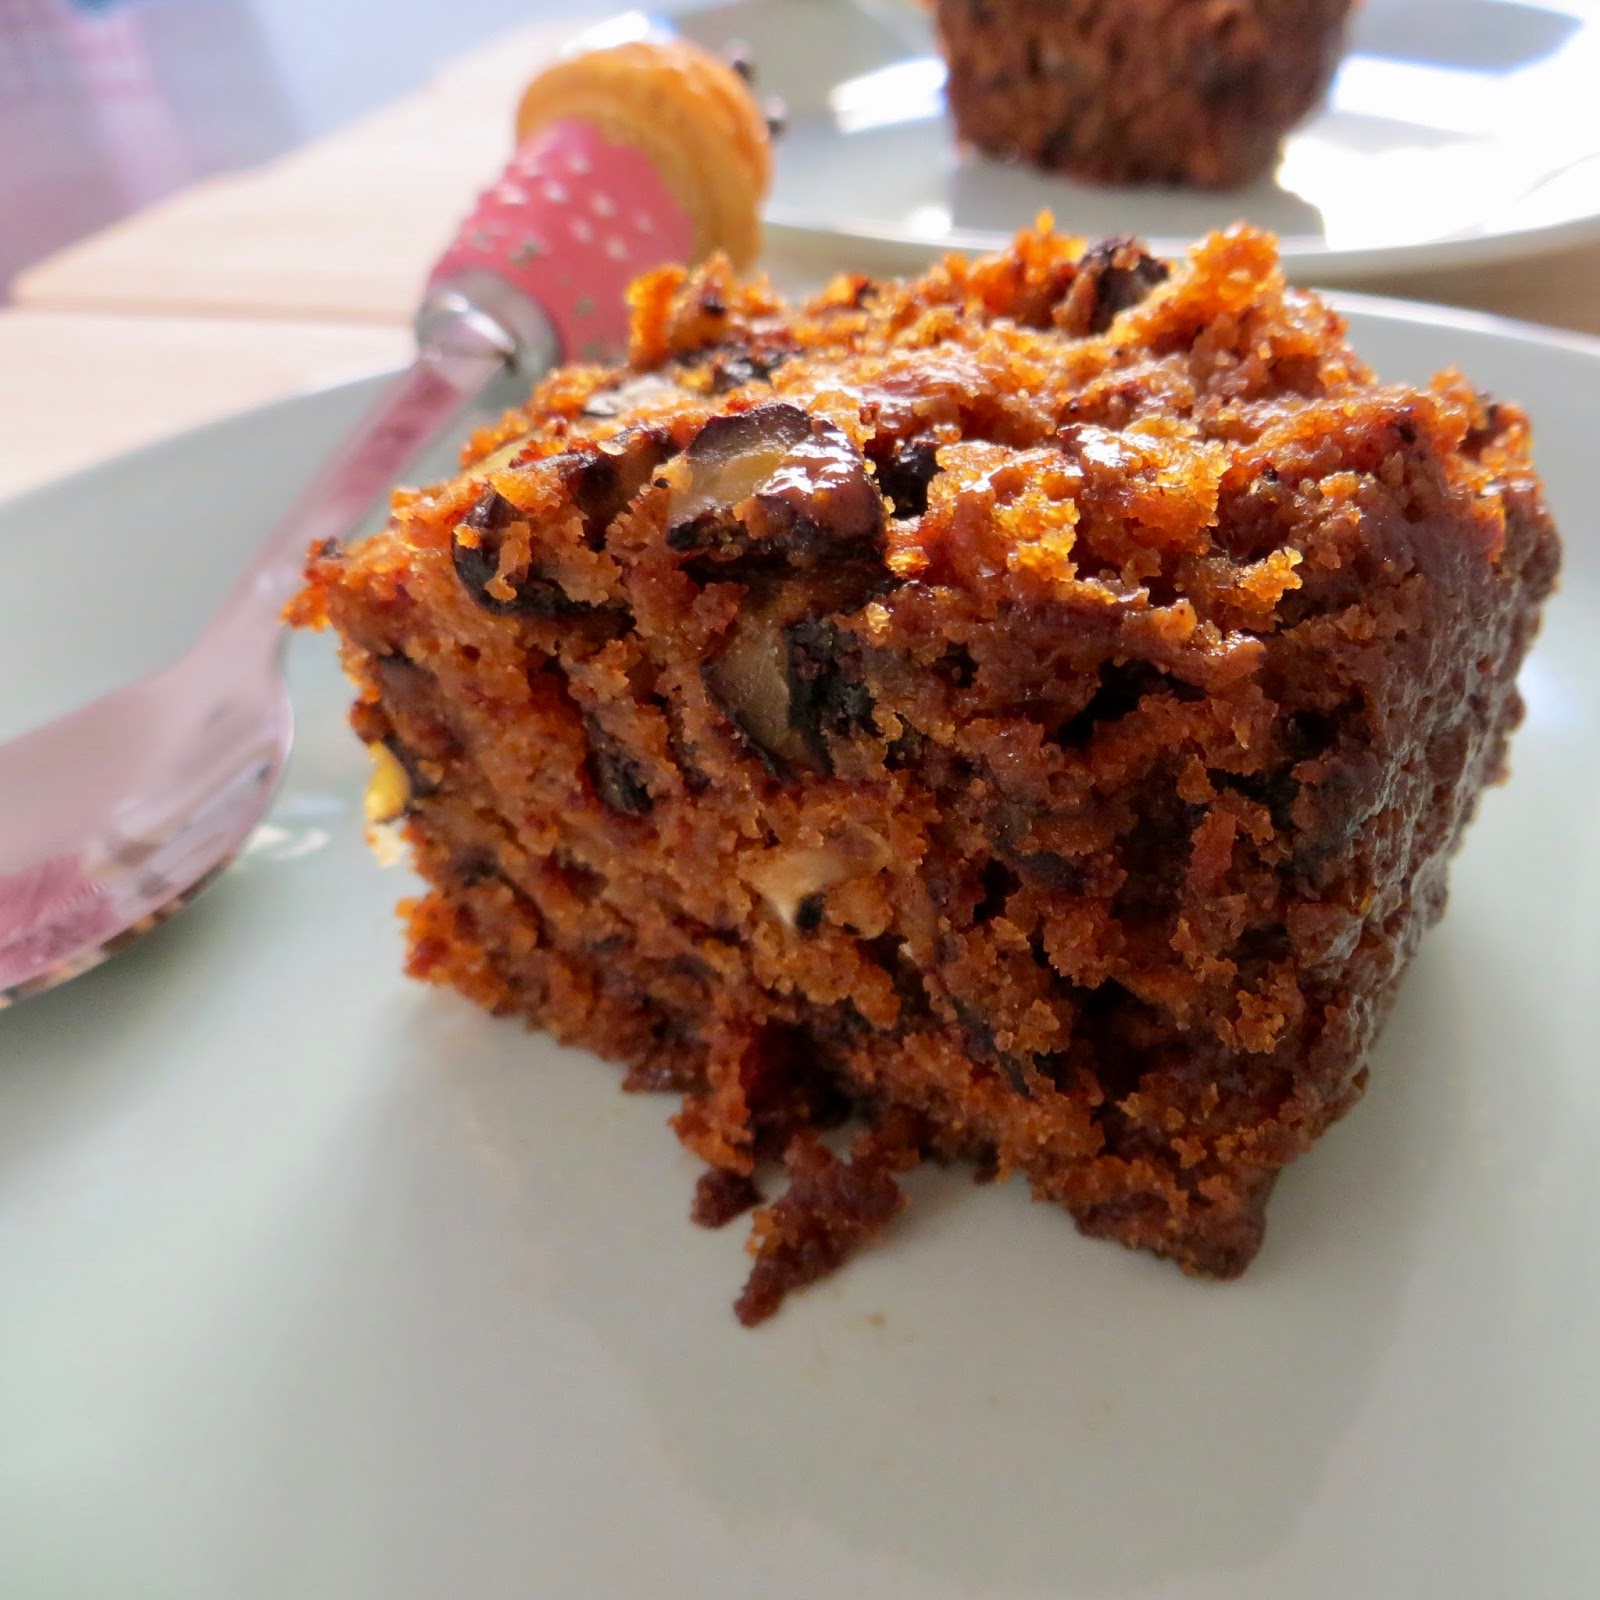
Deja que se atempere antes de hincarle el diente, y si eres capaz de resistirte a la tentación de probarlo, de un día para otro está casi mejor. ¡¡¡Rico, Tierno y Jugoso!!!

5. Decoración (opcional)
Aunque en mi caso tomamos el pastel así directamente (sin dejar ni una migaja), podría haberlo decorado bien con un poco de azúcar glas por encima, o una glasa de naranja, o bien con un frosting de crema de queso.

6. Glasa de naranja (receta)
* Necesitamos:

- 100 ml de zumo de naranja
- 250 g de azúcar glas

Se mezcla muy bien el azúcar con el zumo de naranja y se pinta el pastel, con lo que se le añade un toque cítrico, a la vez que dulce.


************************

I looked forward to cooking a carrot cake (eggs free), but when I tasted in
 "JULIA BAKERY", I decided to make it in my laboratory-kitchen. Here, I showed the pictures I took while I was preparing all the ingredients and the final result.

Ingredients
- 300 g cake flour (read NOTE)
- 270 g brown sugar
- 1 teaspoonful of salt
- 1 teaspoonful of cinnamon
- 1 spoonful of bicarbonate
- 1 spoonful of baking yeast
- 300 g carrots
- 130 g nuts
- 200 ml water
- 180 ml sunflower oil
- 1 spoonful of vanilla extract

NOTE: The original recipe said that we'd use wheat wholemeal.

1. Dry blend
Mix all the dry ingredients: cake flour + brown sugar + salt + cinnamon + bicarbonate. Then, sift all of them (with a sieve) to another and bigger bowl.

2. Solids
Finely grate the peeled carrots (I used my mandolin); break open the nuts and cut them in small pieces.

3. Wet blend
Mix in a vase the wet ingredients: water + sunflower oil + vanilla extract. Next, add it little by little to the dry blend, stirring with a whisk until well mixed. Lastly, add the carrots and nuts, stirring again until obtaining an homogenous blend.

4. Baking
Cover a long baking tin with greaseproof paper, and pour the cake dough in it. Bake it in the preheated oven at 180 ºC for about 1 hour (verify the proper cooking with the help of a stick).
Allow it to reach the room temperature before eating it. If it'd be possible, taste it the next day. The result is a tasty, soft and juicy cake!!!

5. Decoration (optional)
Although in my case, we had the cake with no frosting on top (and it disappeared, anyway), I could have sprinkled with icing sugar, or maybe I could have made an orange glaze, or even a cheese frosting.

6. Orange glaze (recipe)
* We need:

- 100 ml of orange juice
- 250 g of icing sugar

Mix icing sugar and orange juice properly, and then paint the cake. This glaze adds a touch of citrus as well as sweet.

martes, 28 de febrero de 2017

BULGUR A LA ARMENIA (ENSALADA TABULÉ)


Ingredientes
- Bulgur
- Agua
- 1 Cebolla
- 1 Cebolleta
- 2 Tomates maduros
- 1 Pimiento verde
- 1 Pimiento rojo
- 2 Dientes de ajo
- Perejil picado
- Hierbabuena picada (opcional)
- Aceite de oliva
- Zumo de limón
- Sal
- Hojas de lechuga (opcional)


1. Preparación del bulgur
Se cuece el bulgur siguiendo las indicaciones del paquete. En mi caso son las siguientes: 
- Aclarar una parte de bulgur con agua fría y ponerla a hervir con dos partes de agua (ligeramente salada).
- Cuando el agua está hirviendo, bajar la temperatura y cocer unos 7 minutos a fuego lento y sin tapar.
- Escurrir el bulgur, y ya está listo para mezclarlo con los demás ingredientes.

2. Verduras
Se cortan todas las verduras en dados pequeñitos: la cebolla, la cebolleta, los tomates y los pimientos, y todo se va mezclando en un cuenco, junto con el bulgur.

3. Aderezo
Se pican muy fino los dientes de ajo, y se mezclan con el aceite, el zumo de limón, un poco de sal y el perejil (y la hierbabuena, que hace que el plato sea aún más refrescante). Y se añade sobre la mezcla de ingredientes que ya teníamos. Luego, lo dejamos todo ya mezclado en el frigorífico antes de servirlo: este es nuestro tabulé.

4. Ensalada
Para la presentación final del plato, podemos poner unas hojas de lechuga en la base de una fuente plana, y encima el tabulé. ¡¡¡Lista para disfrutar!!!

************************


Ingredients
- Bulgur
- Water
- 1 Onion 
- 1 Chive

- 2 Ripe tomatoes
- 1 Green pepper 
- 1 Red pepper
- 2 Garlic cloves
- Chopped parsley
- Chopped spearmint (optional)
- Olive oil
- Lemon juice
- Salt
- Lettuce leaves (optional)

1. Preparation of bulgur
To boil the bulgur, you should follow the instructions, that in my case were:
- Rinse one measure of bulgur with cold water, then boil it with two measures of lightly salty water.
- Once the water is boiling, lower heat and simmer 7 minutes (uncovered).
- Drain the bulgur, it is ready to be mixed with the rest of ingredients.

2. Vegetables
Cut into small dices all the vegetables: onion, chive, tomatoes, peppers, and then, put them into a bowl together with the bulgur. Mix all the ingredients.

3. Dressing
Mix olive oil, lemon juice, garlic cloves (finely chopped), salt and chopped parsley (if add to this dressing a little of chopped spearmint, the result is a fresher salad). Then, add it over the before mixture, stir everything and set the tabbouleh in the refrigerator.

4. Salad
To finish this typical Armenian dish, put some lettuce leaves in a plate and place the tabbouleh on top. Ready to be enjoyed!!!

GuardarGuardar

martes, 17 de enero de 2017

CUPCAKES casi VEGANOS (sin azúcar ni huevo)


Ingredientes (para 12 cupcakes)
Leche
- Vinagre de manzana
- Sirope de ágave
Aceite de girasol
Extracto de vainilla
Harina para repostería
Levadura para repostería
Bicarbonato
- Sal 
- Queso de untar (para el "frosting")

1. Suero de mantequilla o buttermilk
Mezcla en un bol 150 ml de leche y 1 cucharada de vinagre de manzana, y después déjala reposar unos 10-15 minutos a temperatura ambiente, hasta que adquiera la apariencia de leche cortada. Este suero ayudará a que nuestros bizcochos queden tiernos y esponjosos (cosa totalmente necesaria al prescindir de los huevos en nuestra receta).

2. Mezcla húmeda
A continuación, añade sobre la mezcla anterior: 120 ml de sirope de ágave, 80 ml de aceite de girasol y 2 cucharadas de extracto de vainilla, y batimos con la varilla manual hasta que quede un líquido homogéneo.

3. Mezcla seca 
Por último, incorpora los ingredientes secos (tamizándolos para que queden bien repartidos y no se formen grumos): 160 g de harina, 3/4 de cucharada de levadura, 1/2 cucharada de bicarbonato, y 1/4 de cucharada de sal, y bátelo todo hasta que la masa quede homogénea.

4. Horneado
Reparte la masa sobre una bandeja de horno para magdalenas en sus correspondientes moldes (han salido justo 12 cupcakes con las cantidades utilizadas), y hornéalas a una temperatura de 180ºC durante unos 20-25 minutos; puedes verificar si la cocción es adecuada, pinchando el centro con una brocheta y si sale limpia (¡ya están listas!). Una vez fuera del horno, déjalas enfriar antes de añadirle el frosting.

5. Crema de queso
Mezclar bien unos 500 g de queso de untar con 5 cucharadas de sirope de ágape hasta obtener una mezcla consistente y podamos usar la manga pastelera. ¡Decorar y devorar! 

NOTA: En caso de que queráis que el frosting se endurezca un poco, meted los cupcakes en la nevera, aunque tened en cuenta que si lo dejáis mucho tiempo el bizcocho puede secarse.

************************

Ingredients (12 cupcakes)
- Milk
- Apple vinegar
- Agave syrup
- Sunflower oil
- Vanilla extract
- Cake flour
- Baking yeast
- Bicarbonate
- Salt
- Spreadable cheese (to make the frosting)

1. Buttermilk
Blend in a bowl 150 ml of milk and a spoonful of apple vinegar, wait for for about 10-15 minutes at room temperature until it seems like sour milk. In this way, the buttermilk help us to make sponge cakes softer (since we are not going to use eggs).

2. Wet blend
Now, pour over the buttermilk the next ingredients: 120 ml of agave syrup, 80 ml of sunflower oil and 2 spoonful of vanilla extract; then, stir with a whisk until obtaining an homogeneous wet blend.

3. Dry blend
Lastly, add the dry ingredients (keep in mind you should sift these ingredients for avoiding that clots are formed): 160 g of cake flour, 3/4 of spoonful of baking yeast, 1/2 spoonful of bicarbonate and 1/4 of spoonful of salt; stir again with the whisk until the dough is homogenous.

4. Baking
Use paper baking cups on a muffin tray and pour the dough (with these proportions we can make 12 units) in order to bake them in the preheated oven at 180ºC for about 20 o 25 minutes (verify the proper cooking with the help of a stick). Let cool to room temperature before adding the frosting.

5. Cheese frosting
Mix perfectly 500 g of spreadable cheese and 5 spoonful of agave syrup. When the cream is ready to use the pastry sleeve, decorate the muffins and devour them!

NOTE: Save the cupcakes in the fridge, if you want the frosting gets hardened a little.

GuardarGuardar

lunes, 7 de noviembre de 2016

TRENZA DE CHOCOLATE

En mi casa, un día sí y otro también, se nos hace la boca agua viendo alguno de los videos de TASTEMADE, que a través de distintas plataformas y dispositivos ofrece recetas muy inspiradoras y algunas son muy fáciles de hacer. Este es el caso de la trenza de chocolate: mi goloso "Project Manager" vio el video poco antes de su cumpleaños y me pidió que se la hiciera. Aunque el enlace de la receta original podéis verlo aquí, mi sub-chef rubia favorita y yo la preparamos sin huevo (por temas de alergia) y el resultado es igual de apetecible.


Ingredientes
- Hojaldre
- Tableta de chocolate
- Almendras fileteadas
- Almendras crocanti

1. Coloca, corta, trenza y adorna
Pon la tableta de chocolate (ver NOTA) en el centro de la masa de hojaldre; después haz cortes a la masa (por el lado más largo de la tableta) y ve trenzando las tiras de masa con el objetivo de cubrir todo el chocolate. Añade tu aderezo favorito, que en nuestro caso fueron almendras crocanti y fileteadas.

2. Hornea
Pon la trenza en el horno precalentado a 200ºC durante unos 20-25 minutos, hasta que el hojaldre se dore. Puedes tomarla tibia o fría, pero en cualquier caso es un postre fácil de hacer y delicioso.

NOTA: Los más golosos pueden utilizar chocolate con leche (para mí, sale un poco empalagosa), y quienes prefieran los dulces no muy dulces pueden usar chocolate negro (así me gusta más). Si utilizáis otro tipo de chocolate (blanco, con avellanas, relleno de trufa, ...), contadme qué tal sale.

************************

TASTEMADE offers us a lot of inspiring recipes and some of them are very easy to make, for this reason our mouths begin to water while we are watching these short cooking videos at home on day in and day out. This is the case of the chocolate braid: my gourmand "Project Manager" watched the video a few days before his birthday and asked me to make it. Although the original video is here, my blonde favourite sub-chef and me made the braid egg free (I am allergic) and the result was very similar. 

Ingredients
- Pastry sheet
- Chocolate bar
- Silvered almonds
- Crunched almonds

1. Put, cut, braid and decorate
Put the chocolate bar on the centre of pastry sheet; after that, cut both longer sides and begin to braid the stripes of the pastry in order to cover the chocolate. Then, add your favourite topping, that in this case, were silvered almonds and crunched almonds.

2. Bake
Bake the dessert in a oven preheated at 200ºC for 20-25 minutes, until the pastry sheet is brown. You can have warm or cold, but it is always an easy to make and delicious dessert.

NOTE: Greedy people can use milk chocolate (although I think the result is a little cloying). So, not so gourmand people can use dark chocolate (this is my favourite). But, if you dare to use another kind of chocolate (white chocolate, with hazelnuts, truffle filling, ...), tell me how is the result, please.

martes, 13 de septiembre de 2016

HUMMUS


Ingredientes
- 2 cucharadas de tahini (pasta de sésamo: ver receta *)
- 400 g de garbanzos cocidos
- 1 diente de ajo
- 1/3 cucharadita de sal
- 1/2 cucharadita de comino molido
- Zumo de medio limón
- Medio vaso de agua
- Aceite de oliva (para decorar)
- Pimentón de la Vera (para decorar)


1. Tahini con mortero (receta)
* Para hacer el tahini sólo vamos a necesitar:

- 2 cucharadas de sésamo tostado
- 4 cucharadas de agua o de aceite de oliva (según queramos que la pasta tenga un sabor menos o más intenso)
- una pizca de sal

Con esta cantidades obtendremos la cantidad exacta de pasta de sésamo para la elaboración de nuestro hummus.


Lo suyo es utilizar un molinillo eléctrico, pero en mi caso, uso el mortero y me armo de paciencia para ir machacando las semillas poco a poco, a medida que voy añadiendo el aceite de oliva hasta obtener una pasta con la consistencia adecuada (tal y como puede verse en la foto). Si fuera necesario aligerar la pasta, podemos poner un poco de agua.

2. Hummus
Enjuagamos los garbanzos (de bote) debajo del grifo y los escurrimos con ayuda de un colador. Vamos a usar la batidora de brazo (ya que resultará más fácil el manejo de la crema de garbanzos), así que en el vaso pondremos todos los ingredientes: los garbanzos, el diente de ajo (pelado), la sal, el comino, el zumo de limón y el tahini que acabamos de preparar, y comenzamos a batir. A medida que vamos batiendo, vamos añadiendo agua poco a poco hasta que hayamos obtenido una mezcla cremosa pero consistente.

3. Opcional
Como idea final, para servir el hummus, ponemos una buena cantidad en un cuenco y lo espolvoreamos con un poco de pimentón, comino y un chorrito de aceite de oliva. Queda buenísimo para tomar con pitas, regañás y todo tipo de tostas, aunque yo lo uso también en sándwiches como alternativa a las mayonesas y en ensaladas para darles un punto de originalidad. Se aceptan nuevas sugerencias.

************************


Ingredients
- 2 spoonful of tahini (see recipe *)
- 400 g boiles chickpeas
- 1 garlic clove
- 1/3 teaspoon of salt
- 1/2 teaspoon of ground cumin
- 1/2 Lemon juice
- Half a glass of water
- Olive oil (decoration)
- La Vera paprika (decoration)

1. Tahini made in a mortar (receta)
* To make tahini, we need:

- 2 spoonful of toasted sesame
- 4 spoonful of water or olive oil (depending on we want to make a tahini with a less or more intensive flavour)
- a pinch of salt

I use a wooden mortar because I don't have a electric mill, so it's easy although laborious to make  tahini. Only you have to mash the sesame seeds little by little, adding the olive oil until we achieve the proper consistence. If it'd be necessary, add a little of water.

2. Hummus
Rinse the chickpeas under the water, and leave to drain. We need a hand blender in order to make it easier. Put all the ingredients in the glass: chickpeas, garlic, salt, ground cumin, lemon juice and tahini, and blend them. We add water little by little while we are blending until we get the chickpeas puree: hummus.

3. Optional
To serve the hummus, put it in a bowl and decorate it with a pinch of paprika, ground pepper and a dash of olive oil. It is delicious with any type of breadsticks or crackers, but you should taste the hummus in a sandwich as a mayonnaise substitute or to dress salads. Some new suggestions are welcome!